Schulung-Teil1-Server mit RAID1 aufsetzen: Unterschied zwischen den Versionen
| (5 dazwischenliegende Versionen von 2 Benutzern werden nicht angezeigt) | |||
| Zeile 1: | Zeile 1: | ||
| + | {{#switch:{{#IfLang:}} | ||
| + | |en= | ||
| + | == Preface == | ||
| + | |||
| + | It is planned that we have some interal training every two weeks. This entry is to the training we had on 10-20-16. JR <br /> | ||
| + | <pre> | ||
| + | If there are still questions open after these instructions, please go to "Views" and then "Discussion" to leave your feedback, so I can add more Details to this page. jr | ||
| + | </pre> | ||
| + | <br /> | ||
| + | Instructions for the installation of Debian Jessie in English can be found at "data/Intern/Schulung/Manuals/Server". 3.11.16 mstauffer <br /> | ||
| + | [https://www.howtoforge.com/tutorial/debian-8-jessie-minimal-server Link to Installation Debian Jessie in Englisch] <br /> | ||
| + | [https://blog.sleeplessbeastie.eu/2013/10/04/how-to-configure-software-raid1-during-installation-process/ Link to Software RAID1 in Englisch] <br /> | ||
| + | <br /> | ||
| + | In our case we had computers with 2x250GB HD and 4GB RAM. With the F12 key we were able to select the network boot option, were we chose the Debian Jessie Installer. | ||
| + | Many parts of the installation are done automatically, but some things still require human input. | ||
| + | I didn't memorize the proper synthax during the installation, so the options will be named by it's purpose rather than the exact wording. | ||
| + | |||
| + | == Installation of the Operating System == | ||
| + | This is the part where human input is required: | ||
| + | |||
| + | - Select the language<br /> | ||
| + | ''(what language should the operating system have)''<br /> | ||
| + | - Select country<br /> | ||
| + | ''(relevant for time servers and mirrors)''<br /> | ||
| + | - Select keyboard layout<br /> | ||
| + | ''(in our case it's most likely to be CH-DE, so the keys we type match the keys on the keyboard)''<br /> | ||
| + | - Select server name<br /> | ||
| + | ''(so the user knows on what machine they are working)''<br /> | ||
| + | - Select mirror<br /> | ||
| + | ''(tells the system from what server it should retrieve the necessary files for the network installation)''<br /> | ||
| + | - Set root password<br /> | ||
| + | - Create username and password<br /> | ||
| + | |||
| + | === Partitioning === | ||
| + | - Partitioning<br /> | ||
| + | ''(this requires more human input)''<br /> | ||
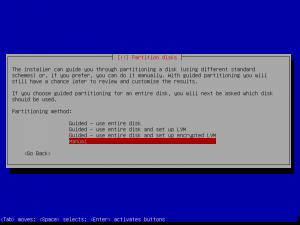
| + | From the possible options we chose the manual installation <br /> | ||
| + | [[Datei:1debian_install-partitioning_method.png|300px]] <br /> | ||
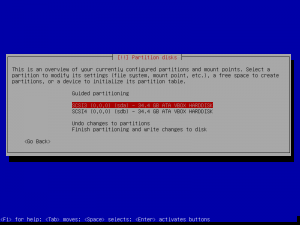
| + | Ideally we have two new hard drives without any partitions. <br /> | ||
| + | [[Datei:2debian_install-partition_disks.png|300px]] <br /> | ||
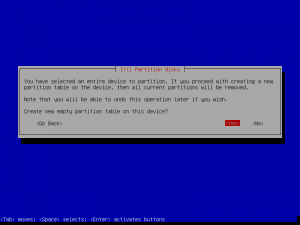
| + | We need to create a partition table for the first hard drive <br /> | ||
| + | [[Datei:3debian_install-partition_disks-create_empty_partition_table.png|300px]] <br /> | ||
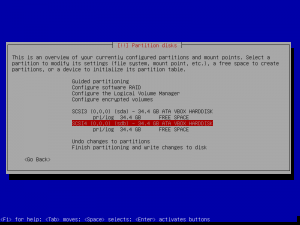
| + | It will look something like the following picture after both hard drives have a partition table<br /> | ||
| + | [[Datei:4debian_install-partition_disks-with_empty_partition_tables.png|300px]] <br /> | ||
| + | Now we select the free space of the first hard drive <br /> | ||
| + | [[Datei:5debian_install-partition_disks-partitions.png|300px]] <br /> | ||
| + | And create a new partition<br /> | ||
| + | [[Datei:6debian_install-partition_disks-create_new_partition.png|300px]] <br /> | ||
| + | ==== Activate Raid1 ==== | ||
| + | Since we're planing to use RAID1 we need to set the "Use as" to "physical volume for RAID".<br /> | ||
| + | [[Datei:7debian_install-partition_disks-create_new_partition_settings.png|300px]] <br /> | ||
| + | And we do the same with the second hard drive. We only had two volumes and not four as the screenshot shows, as I copied it from another site. We will also add LVM to it later<br /> | ||
| + | [[Datei:8debian_install-partition_disks-partitions_end.png|300px]] <br /> | ||
| + | Now we select "Configure software RAID". <br /> | ||
| + | [[Datei:9debian_install-partition_disks-md.png|300px]] <br /> | ||
| + | The changes we've made so far need to be saved, so we select "Yes" to be able to proceed <br /> | ||
| + | [[Datei:10debian_install-partition_disks-save.png|300px]] <br /> | ||
| + | We select "Create MD device" <br /> | ||
| + | [[Datei:11debian_install-partition_disks-md_new.png|300px]] <br /> | ||
| + | And select "RAID1"<br /> | ||
| + | [[Datei:12debian_install-partition_disks-md_new_type.png|300px]] <br /> | ||
| + | In our case it consists of 2 devices<br /> | ||
| + | [[Datei:13debian_install-partition_disks-md_new_number_of_devices.png|300px]] <br /> | ||
| + | And 0 spare devices <br /> | ||
| + | [[Datei:14debian_install-partition_disks-md_new_number_of_spare_devices.png|300px]] <br /> | ||
| + | Now we select the partitions that will be part of our RAID1. We should only have two options and we select both of them.<br /> | ||
| + | [[Datei:15debian_install-partition_disks-md_select_devices.png|300px]] <br /> | ||
| + | Our case is once again diffrent from the screenshot since we only have one RAID-partition. <br /> | ||
| + | [[Datei:16debian_install-partition_disks-md_done.png|300px]] <br /> | ||
| + | ==== Configure LVM and create partitions ==== | ||
| + | Now our instructions are no longer the same as in the english link at the top of the page. We now configure the "Logical Volume Manager" (short LVM). <br /> | ||
| + | - Create Volume-Group<br /> | ||
| + | ''-> in our case we called it "vg01"''<br /> | ||
| + | - Create logical volume<br /> | ||
| + | ''-> In our case we need three partitions (root 20GB, home 10GB and swap 5GB)''<br /> | ||
| + | ''root Mount point = / and "Use as" ext4 ''<br /> | ||
| + | [[Datei:17debian_install-partition_disks-md0.png|300px]] <br /> | ||
| + | ''home Mount point = /home and "Use as" ext4''<br /> | ||
| + | ''swap "Use as" swap area''<br /> | ||
| + | [[Datei:18debian_install-partition_disks-md1.png|300px]] <br /> | ||
| + | Once all the partitions are create, the hard part is over <br /> | ||
| + | [[Datei:19debian_install-raid_done.png|300px]] <br /> | ||
| + | And we wish to write the changes to the disk <br /> | ||
| + | [[Datei:20debian_install-confirm.png|300px]] <br /> | ||
| + | <br /> | ||
| + | ''While the packages are being installed we can change to a different console with Alt+F4. Here we can see what the the installation program does. With Alt+F1 we get back to graphical version of the installation program.'' | ||
| + | <br /> | ||
| + | - We only selected the SSH server and default system tools<br /> | ||
| + | ''-> for a normal computer you'd also chose one or more desktop enviroments and possibly also the print server''<br /> | ||
| + | - Install Grub2 on both hard drives<br /> | ||
| + | [[Datei:21debian_install-grub.png|300px]] <br /> | ||
| + | ''-> As we've only installed it on one hard drive so far we don't finish, but go back and install GRUB in the other hard drives boot sector''<br /> | ||
| + | - Reboot the computer<br /> | ||
| + | - login as root<br /> | ||
| + | |||
| + | == First steps on the new system == | ||
| + | - apt update<br /> | ||
| + | - apt install sudo<br /> | ||
| + | - adduser "username" sudo<br /> | ||
| + | - exit<br /> | ||
| + | - Login with your username now<br /> | ||
| + | - nano .bashrc ''in the home folder of your username''<br /> | ||
| + | |||
| + | The file is opened in the editor and there you want to remove the # on the line where there's written "force_color_prompt=yes" -> your regular user will show up in green now<br /> | ||
| + | ''If you wish to have a different colour, you need to make some modifications:'' | ||
| + | |||
| + | PS1='${debian_chroot:+($debian_chroot)}\['''''\033[01;32m\''''']\u@\h\[\033[00m\]:\[\033[01;34m\]\w\[\033[00m\]\$ ' | ||
| + | |||
| + | \[\033[0;30m\] black <br /> | ||
| + | \[\033[1;30m\] dark grey <br /> | ||
| + | \[\033[0;31m\] red <br /> | ||
| + | \[\033[1;31m\] light red <br /> | ||
| + | \[\033[0;32m\] green <br /> | ||
| + | \[\033[1;32m\] light green <br /> | ||
| + | \[\033[0;33m\] brown <br /> | ||
| + | \[\033[1;33m\] yellow <br /> | ||
| + | \[\033[0;34m\] blue <br /> | ||
| + | \[\033[1;34m\] light blue <br /> | ||
| + | \[\033[0;35m\] dark purple <br /> | ||
| + | \[\033[1;35m\] light purple <br /> | ||
| + | \[\033[0;36m\] dark turquoise <br /> | ||
| + | \[\033[1;36m\] turquoise <br /> | ||
| + | \[\033[0;37m\] light grey <br /> | ||
| + | \[\033[1;37m\] white <br /> | ||
| + | \[\033[0m\] colourless <br /> | ||
| + | |||
| + | That root also has the promt in colour, you need to copy the .bashrc as root (or sudo) into /root/ and edit the newly copied file. To change it to red you need to change the 34 to 31 or if you want a different colour, enter the proper colour code. [https://wiki.ubuntuusers.de/Bash/Prompt/ For further information to individualize your CLI in German] <br /> | ||
| + | <br /> | ||
| + | To learn how to setup a Xen-Hypervisor, please follow the link to [http://wiki.revamp-it.ch/index.php?title=Schulung-Teil2-Server_mit_Xen_aufsetzen Teil2] or if you wish to setup an Apache2-server you can go to [http://wiki.revamp-it.ch/index.php?title=Schulung-Teil3-Webserver_aufsetzen Teil3].<br /> | ||
| + | |||
| + | |||
| + | |#default= | ||
== Vorwort == | == Vorwort == | ||
| Zeile 81: | Zeile 213: | ||
[[Datei:20debian_install-confirm.png|300px]] <br /> | [[Datei:20debian_install-confirm.png|300px]] <br /> | ||
<br /> | <br /> | ||
| − | ''Während jetzt die Installation der | + | ''Während jetzt die Installation der Pakete läuft kann man über Alt+F4 auf eine andere Konsole welchseln, wo man sehen kann was das Installationsprogramm macht. Über Alt+F1 kommt man wieder zum Bild vom Installationsprogramm.'' |
<br /> | <br /> | ||
- nur SSH server und Standard-Systemwerkzeuge auswählen<br /> | - nur SSH server und Standard-Systemwerkzeuge auswählen<br /> | ||
| Zeile 125: | Zeile 257: | ||
<br /> | <br /> | ||
Um zu erfahren, wie man einen Xen-Hypervisor aufsetzt geht man zum [http://wiki.revamp-it.ch/index.php?title=Schulung-Teil2-Server_mit_Xen_aufsetzen Teil2] der Schulungen oder falls man direkt einen Apache2-Server aufsetzen will zu [http://wiki.revamp-it.ch/index.php?title=Schulung-Teil3-Webserver_aufsetzen Teil3].<br /> | Um zu erfahren, wie man einen Xen-Hypervisor aufsetzt geht man zum [http://wiki.revamp-it.ch/index.php?title=Schulung-Teil2-Server_mit_Xen_aufsetzen Teil2] der Schulungen oder falls man direkt einen Apache2-Server aufsetzen will zu [http://wiki.revamp-it.ch/index.php?title=Schulung-Teil3-Webserver_aufsetzen Teil3].<br /> | ||
| − | + | }} | |
| − | [[Kategorie:Schulungen_/_Workshops]] | + | [[Kategorie:Schulungen_/_Workshops]],[[Kategorie:Server-Schulung]] |
Aktuelle Version vom 24. April 2017, 11:08 Uhr
Vorwort
Wir haben neu alle zwei Wochen (voraussichtlich) interne Schulungen und dieser Eintrag ist zum 20.10.16. JR
Falls noch Fragen offen sind nach dieser Anleitung bitte oben bei "Ansichten" auf "Diskussion" gehen und Feedback hinterlassen, dass ich noch weitere Details hinzufügen kann. jr
Anleitung für Installationen Debian jessi in Englisch sind unter "data/Intern/Schulung/Manuals/Server" zu finden. 3.11.16 mstauffer
Link zu Anleitung Debian Jessie auf Englisch
Link zu Software RAID1 auf Englisch
In unserem Fall haben wird einen PC mit 2x250GB Festplatten und 4GB RAM genommen. Über F12 kamen wir auf unseren PCs zum Netzwerkboot, wo wir den Debian Jessie Installer ausgewählt haben.
Vieles macht das Installlationsprogramm alleine, doch einige Sachen müssen noch vom Mensch ausgewählt oder eingestellt werden.
Ich habe nicht während dem Durchlaufen die genaue Synthax gemerkt, somit kann es sein, dass ich nur sinngemäss geschrieben habe wie eine Option heisst und keine Garantie für den genauen Wortlaut.
Installation vom Betriebsystem
Hier ist der Ablauf wo es Feedback braucht:
- Sprache wählen
(welche Sprache soll das Betriebssystem haben)
- Land wählen
(relevant für den Zeitserver und Spiegel)
- Keyboard Layout wählen
(in unserem Fall wohl meistens das Schweizerdeutsche Keyboard-Layout, dass wir alle Zeichen an der aufgedruckten Stelle haben)
- Servernamen wählen
(dass der Anwender weiss, auf welchem Gerät er/sie sich befindet)
- Spiegel wählen
(von welchem Server sollen die benötigten Daten der Netzwerkinstallation geholt werden)
- Root Passwort setzen
- Benutzernamen erstellen, Passwort wählen
Partitionieren
- Partitionieren
(hier muss man ein mehr manuell machen)
Von den möglichen Varianten wählen wir die manuelle Erstellung der Partitionen
Im Idealfall haben wir zwei frische Festplatten die keine Partitionen haben.
Also muss man der Festplatte als erstes eine Partitionstabelle geben
Es wird etwa so aussehen wie im folgenden Bild nachdem man beiden Festplatten eine Partitionstabelle gegeben hat
Also wählen wir den freien Speicher der ersten Festplatte an
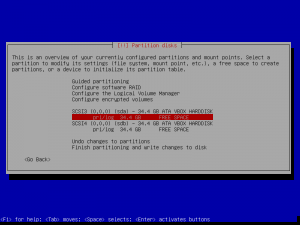
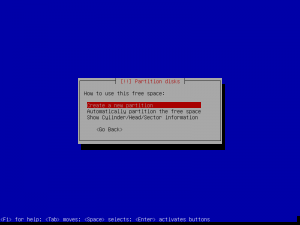
Und erstellen eine neue Partition
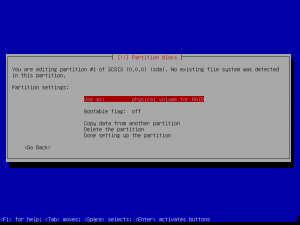
Raid1 aktivieren
Da wir diese RAID1 haben wollen wählen wir bei der Option "Benutzen als" die Zeile aus wo steht "physisches Volumen für RAID".
Das gleiche macht man anschliessend auch mit der zweiten Festplatte. Bei uns gibt es nur zwei Volumen und nicht 4 wie im kopierten Bild, da wir später noch LVM aktivieren
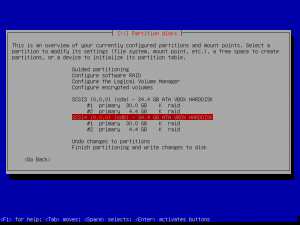
Jetzt wählen wir die Option aus um das Software-RAID zu konfigurieren.
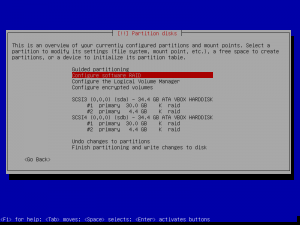
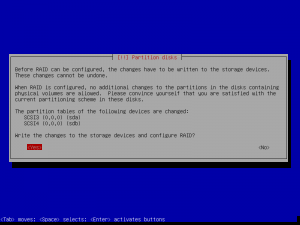
Die Änderungen die wir bisher gemacht haben müssen erst gespeichert werden bevor wir weiterfahren können, somit muss man hier "Ja" auswählen
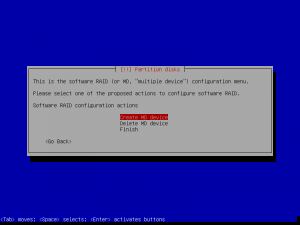
Wir wollen also ein neues MD erstellen
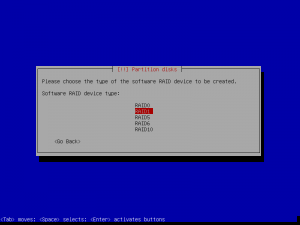
Und wählen hier "RAID1" aus
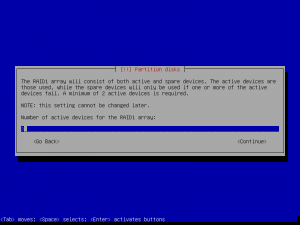
In unserem Fall besteht es aus 2 Geräten
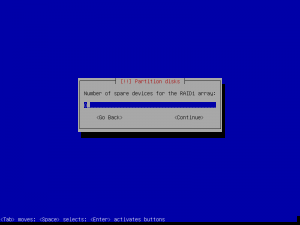
und 0 Reserve-Geräte
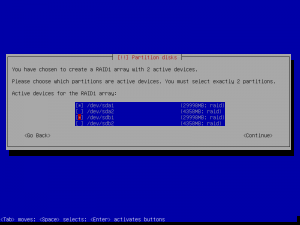
Jetzt wählen wir die Partitionen aus, welche Teil von unserem RAID1 werden sollen. Hier sollten wir dann nur 2 Möglichkeiten haben in unserem Fall, wovon wir beide auswählen
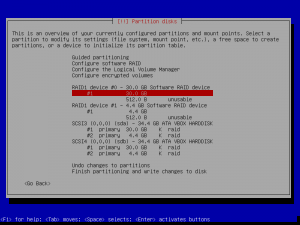
In unserem Fall sieht es wieder ein weniger anders aus, als im Bild, da wir nur eine RAID-Partition haben
LVM konfigurieren und Partitionen erstellen
Falls man den englischen Link genutzt hat weichen wir jetzt davon ab. Wir gehen jetzt den "Logical Volume Manager" (kurz LVM) konfigurieren
- Volume-Gruppe erstellen
-> in unserem Fall heisst dieses vg01
- Logische Volumen erstellen
-> Für unser Fall werden 3 Volumen benötigt (root mit 20GB, home mit 10GB und swap mit 5GB)
root Einbindungspunkt = / mit ext4 erstellen
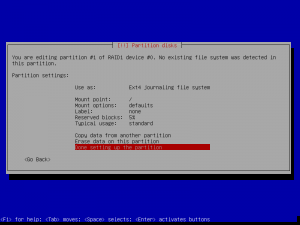
home Einbindungspunkt = /home mit ext4 erstellen
swap Benutzen als mit Auslagerungsspeicher erstellen
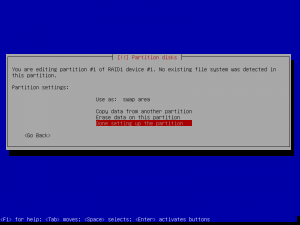
Wenn man alle gewünschten Partitionen erstellt hat ist man hier für den Moment fertig
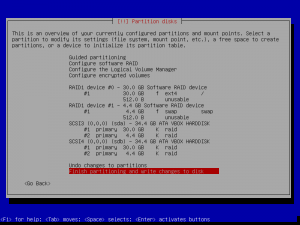
Und man muss bestätigen, dass man diese Änderungen durchführen will
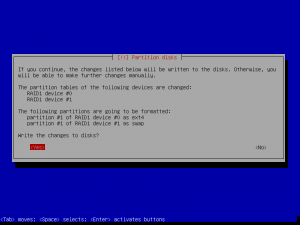
Während jetzt die Installation der Pakete läuft kann man über Alt+F4 auf eine andere Konsole welchseln, wo man sehen kann was das Installationsprogramm macht. Über Alt+F1 kommt man wieder zum Bild vom Installationsprogramm.
- nur SSH server und Standard-Systemwerkzeuge auswählen
-> bei einem normalen PC würde man noch ein oder mehrere Desktop Enviroments auswählen und wohl auch einen Druckserver
- Grub2 auf beiden Festplatten im Bootsektor installieren
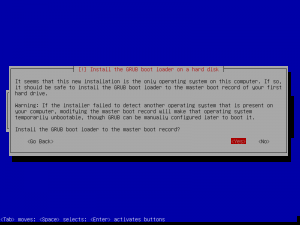
-> Also noch nicht auf weiter, sondern zurück und GRUB im Bootsektor installieren auswählen und dann die andere Festplatte als Ziel wählen
- PC muss neu starten
- als root einloggen
Erste Schritte auf dem neuen System
- apt update
- apt install sudo
- adduser "username" sudo
- exit
- als "Benutzernamen" anmelden
- nano .bashrc im home ordner von "Benutzernamen"
in der geöffneten Datei im Editor # bei force_color_prompt=yes entfernen -> normaler User wird in Grün angezeigt
Falls man eine andere Farbe wünscht muss man in der folgenden Zeile eine Anpassung machen:
PS1='${debian_chroot:+($debian_chroot)}\[\033[01;32m\]\u@\h\[\033[00m\]:\[\033[01;34m\]\w\[\033[00m\]\$ '

\[\033[0;30m\]	schwarz

\[\033[1;30m\]	dunkelgrau

\[\033[0;31m\]	rot

\[\033[1;31m\]	helles rot

\[\033[0;32m\]	grün

\[\033[1;32m\]	hellgrün

\[\033[0;33m\]	braun

\[\033[1;33m\]	gelb

\[\033[0;34m\]	blau

\[\033[1;34m\]	hellblau

\[\033[0;35m\]	dunkellila

\[\033[1;35m\]	helllila

\[\033[0;36m\]	Dunkeltürkis

\[\033[1;36m\]	Türkis

\[\033[0;37m\]	Hellgrau

\[\033[1;37m\]	weiß

\[\033[0m\]	farblos
Dass auch Root eine farbige Anzeige hat, kopiert man als Root (oder sudo) die .bashrc in den /root/ und mit Editor auf 31 ändern oder gewünschten Farbcode. Für weitere Informationen zur Individualisierung gibt es hier diesen Link auf Deutsch
Um zu erfahren, wie man einen Xen-Hypervisor aufsetzt geht man zum Teil2 der Schulungen oder falls man direkt einen Apache2-Server aufsetzen will zu Teil3.
,